특정 condition이나 loop로 System Verilog의 flow를 control 할 수 있습니다.
System Verilog Loop
Sequential flow가 반복적으로 진행된다면 다음과 같은 loop structure로 간편하게 구현할 수 있습니다.
| Loop | Description |
|---|---|
| forever | Runs the given set of statements forever |
| repeat | Repeats the given set of statements for a given number of times |
| while | Repeats the given set of statments as long as given condition is true |
| for | Similar to while loop, but more condense and popular form |
| do while | Repeats the given set of statements atleast once, and then loops as long as condition is true |
| foreach | Used mainly to iterate through all elements in an array |
forever loop
forever은 while(1)과 같이 simulation이 진행되는 동안 끊임없이 반복되는 loop입니다.
module top();

  //clk 선언
  logic clk; initial clk = 1'b0;

  //forever loop
  initial begin
    forever #5 clk = ~clk;
  end

  //Simulation run time
  initial #50 $finish;

  //dump file 생성
  initial begin
    $dumpfile("dump.vcd");
    $dumpvars;
  end

endmodule$finish task를 통해 따로 simulation을 종료하는 구문을 넣은 예시의 결과입니다.

repeat loop
앞서 살펴본 forever가 무한히 반복되는 loop이라면, repeat은 반복 횟수를 지정하는 loop입니다.
module top();

  logic clk; initial clk = 1'b0;

  initial begin
    repeat(3) #5 clk = ~clk;
  end

  initial #50 $finish;

  initial begin
    $dumpfile("dump.vcd");
    $dumpvars;
  end

endmodule위의 simulation을 실행하면 clk가 3번만 토글 하는 것을 확인할 수 있습니다.

while, do while loop
while은 조건이 참일 경우 해당 flow가 반복되는 loop입니다.
module top();

  int cnt = 0;

  initial begin

    while (cnt < 5 ) begin
      $display("cnt = %0d", cnt);
      cnt++;
    end

  end

endmodule>> cnt = 0
>> cnt = 1
>> cnt = 2
>> cnt = 3
>> cnt = 4
반면 do while은 statement를 한번 실행한 뒤, 조건이 참일 경우 해당 flow가 반복되는 loop입니다.
module top();

  int cnt   = 0;
  int cnt_1 = 0;

  initial begin

    while (cnt == 5 ) begin
      $display("cnt = %0d", cnt);
      cnt++;
    end

  end

  initial begin

    do begin
      $display("cnt_1 = %0d", cnt_1);
      cnt++;
    end while (cnt == 5 );

  end

endmodule>> cnt_1 = 0 (cnt는 출력 안 됨)
즉, 이 둘의 차이점은 조건이 거짓이라도 do while 문은 적어도 한번 statement가 실행된다는 것입니다.
for loop
System Verilog에서 Verilog와 달라진 점은 다음과 같습니다.
- for 루프 내에서 변수 선언
- for 루프 내에서 하나 이상의 초기 선언, 수정
module top();

  initial begin
    $display("###############");

    for(int i=0; i<4; i++) $display("i = %0d",i);

    $display("###############");
  end

  initial begin
    $display("###############");

    for ( int j=0,i=4; j<8; j++) begin
      if(j==i) $display("i = j. j=%0d i=%0d",j,i);
    end

    $display("###############");
  end

  initial begin
    $display("###############");

    for ( int j=0,i=3; j<4; j++,i--) begin
      $display("j=%0d, i=%0d",j,i);
    end

    $display("###############");
  end

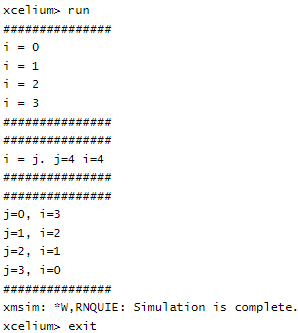
endmodule위와 같이 System Verilog에서는 더 강화된 for 문을 사용할 수 있습니다.
foreach
System Verilog foreach는 array의 요소에 대한 반복을 지정합니다. Loop 변수는 array 요소에 따라 결정되며, 변수 개수는 array size와 일치해야 합니다.
module top();

  int array_1[4];
  int array_2[3][2];

  initial begin
    $display("###############");

    foreach(array_1[i]) begin
      array_1[i] = i;
      $display("array_1[%0d]=%0d",i,array_1[i]);
    end

    $display("###############");
  end

  initial begin
    $display("###############");

    foreach(array_2[i,j]) begin
      array_2[i][j] = i+j;
      $display("array_2[%0d][%0d]=%0d",i,j,array_2[i][j]);
    end

    $display("###############");
  end

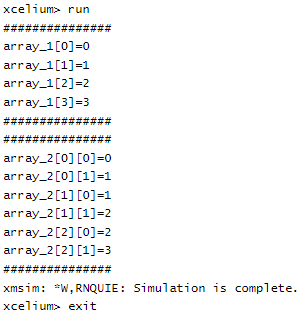
endmoduleSimulation 결과는 다음과 같습니다.
합성 가능 여부
위 구문들은 대부분 testbench 용 loop입니다. 이 말은, system verilog 합성 시 실제 반도체 회로로 구현되지 않는다는 것입니다. for 문 / while 문 / foreach 문이 합성이 가능하지만, 실제 RTL 설계에서는 for loop를 주로 사용합니다.
Break, Continue
Break와 continue는 System Verilog의 loop 구조(forever, repeat, while, do-while, for, foreach)에서 사용할 수 있는 구문입니다.

간단한 예시를 볼까요?
module top();

  initial begin
    $display("#####################");

    for (int i=0; i<8; i++) begin

      if ((i > 2) && (i < 5)) begin
        $display("Continue");
        continue;
      end

      if (i==6) begin
        $display("Time to finish i = %0d",i);
        break;
      end

      $display("INT i = %0d",i);
    end

    $display("#####################");

  end

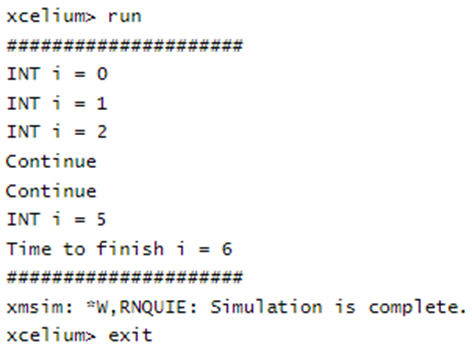
endmoduleSimulation 결과는 다음과 같습니다.
if – else
System Verilog의 if – else에는 Verilog에는 없는 unique-if와 priority-if가 추가되었습니다.
unique-if
unique-if는 모든 조건을 동시에 판단합니다. 그리고 두 개 이상의 조건에서 true이거나 true 조건이 없을 때, 즉 else 조건이 없으면 warning을 발생시킵니다.
module top();

  int a,b,c;

   initial begin
     a=10;
     b=20;
     c=40;

     unique if ( a < b ) $display("a is less than b");
     else   if ( a < c ) $display("a is less than c");
     else                $display("a is greater than b and c");
  end

endmodule>> xmsim: *W,MCONDE: Unique if violation: Multiple true if clauses at {line=10:pos=13 and line=11:pos=13}.
module top();

  int a,b,c;

   initial begin
     a=50;
     b=20;
     c=40;

     unique if ( a < b ) $display("a is less than b");
     else   if ( a < c ) $display("a is less than c");
     //else                $display("a is greater than b and c");
  end

endmodule>> xmsim: *W,NOCOND: Unique if violation: Every if clause was false.
priority-if
priority-if는 모든 조건을 순차적으로 판단합니다. 그리고 true 조건이 없거나 최종 else가 없으면 warning을 발생시킵니다.,
module top();

  int a,b,c;

  initial begin
     a=50;
     b=20;
     c=40;

     priority if ( a < b ) $display("a is less than b");
     else     if ( a < c ) $display("a is less than c");
  end

endmodule>> xmsim: *W,NOCOND: Priority if violation: Every if clause was false.
Event
Event는 둘 이상의 동시에 발생하는 process를 동기화시키는 데 사용됩니다.
event e1;
event e2 = e1;
event done = null;Event는 ->나 ->> 연산자를 통해 trigger 되고, @ 연산자와 .triggered로 event의 변화를 감지할 수 있습니다.
module top();

  event event_a;

  initial begin
    #20 -> event_a;
    $display("[%0t] Thread1: event_a triggered", $time);
  end

  initial begin
    $display("[%0t] Thread2: waiting event_a", $time);
    @(event_a);
    $display("[%0t] Thread2: received event_a", $time);
  end

  initial begin
    $display("[%0t] Thread3: waiting event_a", $time);
    wait(event_a.triggered);
    $display("[%0t] Thread3: received event_a", $time);
  end

endmoduleThread3는 wait으로 event를 감지했는데요, wait(event_a)를 입력하면 에러가 발생합니다.
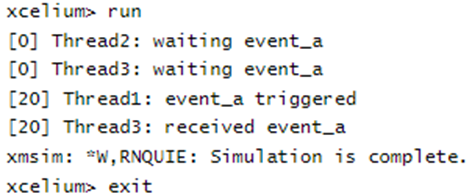
위의 예시에서 @와 .triggered의 차이가 무엇일까요?? 아래 예시를 확인해봅시다.
module top();

  event event_a;

  initial begin
    #20 -> event_a;
    $display("[%0t] Thread1: event_a triggered", $time);
  end

  initial begin
    $display("[%0t] Thread2: waiting event_a", $time);
    #20 @(event_a);
    $display("[%0t] Thread2: received event_a", $time);
  end

  initial begin
    $display("[%0t] Thread3: waiting event_a", $time);
    #20 wait(event_a.triggered);
    $display("[%0t] Thread3: received event_a", $time);
  end

endmoduleEvent 감지를 trigger 되는 순간에 하면 다음과 같은 결과가 나옵니다.
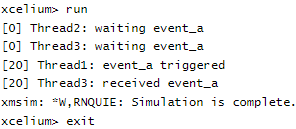
wait은 non-blocking statement여서 같은 time-slot에서 # delay 후에 실행되어 event를 감지할 수 있지만, @는 blocking statement여서 # delay 이전에 실행되어 event를 감지할 수 없습니다. (race condition) 이때는 ->>를 활용하면 됩니다.
module top();

  event event_a;

  initial begin
    #20 ->> event_a;
    $display("[%0t] Thread1: event_a triggered", $time);
  end

  initial begin
    $display("[%0t] Thread2: waiting event_a", $time);
    #20 @(event_a);
    $display("[%0t] Thread2: received event_a", $time);
  end

  initial begin
    $display("[%0t] Thread3: waiting event_a", $time);
    #20 wait(event_a.triggered);
    $display("[%0t] Thread3: received event_a", $time);
  end

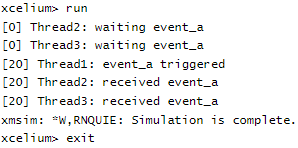
endmoduleTrigger 연산자를 ->가 아닌 ->>를 쓰면 @에서도 event를 감지할 수 있습니다.
Functions
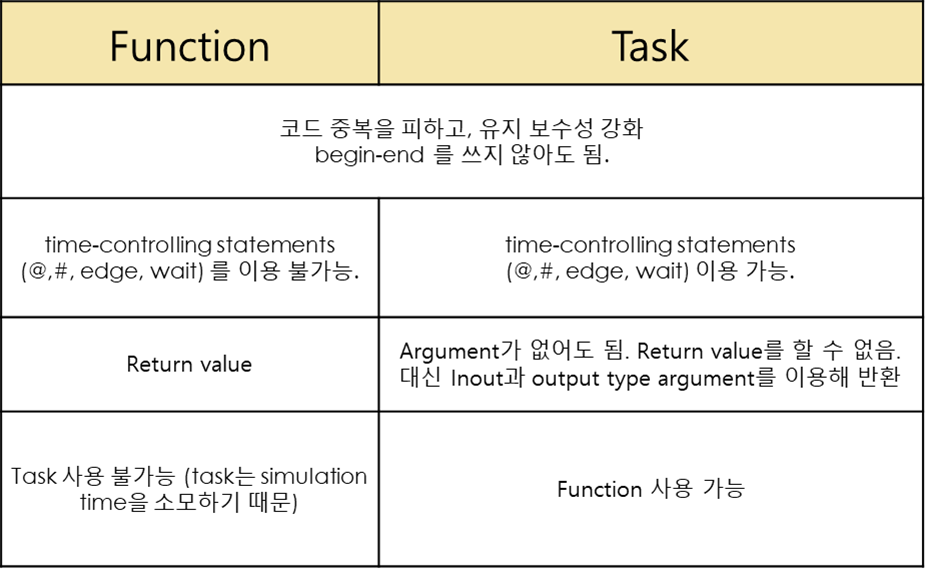
System Verilog의 function은 반복적인 statement를 하나의 function으로 선언하여 code line을 줄이는 데 사용합니다. function은 다음과 같은 제약조건이 있습니다.
- #, @, wait, posedge, negedge 같은 time-controlled statements 사용 불가
- function 안에 다른 function을 사용할 수 있지만, task는 불가(task는 시간 소모)
- 최소한 하나의 input이 필요하고 output과 inout을 선언할 수 없음
- non-blocking assignment, force-release or assign-deassign 사용 불가
선언 방법은 다음과 같습니다.
function [automatic] [return_type] name ([port_list]);
  [statements]
endfunction간단한 예제를 확인해볼까요?
function int sum (
   int x
  ,int y
);
  sum = x + y;
endfunction

function int mul (
   int x
  ,int y
);
  return x * y;
endfunction

module top ();

  initial begin

    $display("sum(3,4) = %0d", sum(3,4));
    $display("mul(3,4) = %0d", mul(3,4));

  end

endmodule>> sum(3,4) = 7
>> mul(3,4) = 12
만약 출력값이 없으면 void function으로 지정할 수 있습니다.
module top ();

  function void print_hello;
    $display("Hello System Verilog!!");
  endfunction

  initial begin
    print_hello;
  end

endmodule>> Hello System Verilog!!
Task
Task도 function과 마찬가지로 반복적인 statement를 하나로 줄일 수 있습니다. Function과 차이점은 time-controlled statement를 사용할 수 있다는 것입니다.
module top;
  int x;

  //task to add two integer numbers.
  task sum(input int a,b,output int c);
    c = a+b;
  endtask

  initial begin
    sum(10,5,x);
    $display("Value of x = %0d",x);
  end
endmodule>> Value of x = 15
참고: chip verify


![[Verilog] 비동기 신호 처리: CDC와 Metastability](data:image/svg+xml;base64,PHN2ZyB4bWxucz0iaHR0cDovL3d3dy53My5vcmcvMjAwMC9zdmciIHZpZXdCb3g9IjAgMCA3MjcgMzIyIiB3aWR0aD0iNzI3IiBoZWlnaHQ9IjMyMiIgYnYtaW1nLXVybD0iaHR0cHM6Ly9ydGxlYXJuZXIuY29tL3dwLWNvbnRlbnQvdXBsb2Fkcy9hbF9vcHRfY29udGVudC9JTUFHRS9ydGxlYXJuZXIuY29tL3dwLWNvbnRlbnQvdXBsb2Fkcy8yMDI1LzEyL2ltZy5qcGcuYnYud2VicCIgYnYtcmVzaXplZC1pbmZvcz0iTkRnd0xtcHdaem8wT0RBcU1qRXpPemd5TUM1cWNHYzZOekkzS2pNeU1qc3hOVE0yTG1wd1p6bzNNamNxTXpJeSI+PC9zdmc+)

